Smart individuals know that perfect pedicures are not just for a day at the spa – they’re an important skill for maintaining polished feet year-round. In this detailed guide, we will examine into the intricacies of achieving a professional-looking pedicure at home, complete with tips and tricks to elevate your at-home spa experience. Prepare to pamper your feet and put your best foot forward with our expert advice. Let’s dive in and master the art of the smart pedicure!
Preparing for the Perfect Pedicure
Gathering Essential Tools and Supplies
Before delving into the art of the smart pedicure, it is imperative to gather all the necessary tools and supplies. This includes a basin for soaking your feet, nail clippers, a foot file, cuticle pusher, nail polish, base and top coat, and of course, your favorite foot scrub and lotion.
Creating a Relaxing Ambiance
Preparing the perfect pedicure involves more than just the physical tools. Creating a relaxing ambiance is key to achieving a truly luxurious experience. Set the mood with soft lighting, calming music, and perhaps a scented candle to create a spa-like atmosphere in the comfort of your own home.
One can never underestimate the power of ambiance in enhancing any beauty routine. By transforming your space into a sanctuary of relaxation, you not only elevate the experience but also set the stage for a truly indulgent pampering session.
Plus, don’t forget to treat yourself to a refreshing beverage of your choice to sip on during your pedicure. Whether it’s a glass of bubbly or a fruity mocktail, a delightful drink can add an extra touch of luxury to your at-home spa experience.
Softening and Soaking
There’s no denying the importance of preparing your feet properly before begining on a pedicure journey. Softening and soaking your feet not only relaxes and rejuvenates tired muscles but also helps in making the subsequent steps easier and more effective.
The Importance of Softening Cuticles
Cuticles play a crucial role in protecting our nails from infections, so it’s necessary to soften them before pushing them back or trimming them. Softening cuticles makes them more pliable, reducing the risk of causing damage or pain during the process. To soften cuticles, soak your feet in warm, soapy water for about 10-15 minutes. Alternatively, you can use a cuticle softener to accelerate the softening process.
Soaking Techniques for Optimal Results
Optimal results in a pedicure largely depend on the soaking process. Besides softening cuticles, soaking your feet helps in loosening dirt, dead skin cells, and calluses, making them easier to remove. To enhance your soaking experience, add a few drops of necessary oils like lavender or peppermint to the water for a spa-like touch. For an extra pampering session, consider using a foot soak with ingredients like Epsom salt, which can soothe tired muscles and reduce swelling.
Importance of ensuring the water temperature is lukewarm rather than hot cannot be understated. Hot water can strip the skin of its natural oils, leaving it dry and prone to damage. To reap the full benefits of soaking, aim for a comfortable temperature that relaxes your muscles without harming your skin.
Exfoliating and Scrubbing
Even a smart pedicure isn’t complete without the crucial step of exfoliating and scrubbing. This necessary part of the pampering process helps to remove dead skin cells, smooth rough patches, and leave your feet feeling soft and rejuvenated.
Choosing the Right Exfoliant for Your Skin Type
Exfoliating is not a one-size-fits-all process. It’s important to consider your skin type when selecting the right exfoliant for your feet. If you have sensitive skin, opt for a gentler exfoliant with natural ingredients like oatmeal or sugar. For tougher skin, you can go for a stronger exfoliant with ingredients like pumice or salicylic acid to effectively slough off dead skin cells.
Effective Scrubbing Techniques for Smooth Feet
To achieve silky smooth feet, it’s crucial to master effective scrubbing techniques. Start by soaking your feet in warm water to soften the skin, then apply the scrub in gentle, circular motions. Focus on rough areas like heels and the balls of your feet, but don’t forget the rest of your feet too. Rinse off the scrub thoroughly and pat your feet dry for best results.
Another tip for effective scrubbing is to invest in a good foot scrub brush or pumice stone to help buff away stubborn calluses and rough patches. These tools can provide more targeted exfoliation and leave your feet feeling baby soft.
Trimming and Shaping
Mastering the Art of Toenail Trimming
To master the art of a smart pedicure, precision in toenail trimming is key. Pay attention to the shape and length of your toenails to achieve a polished and professional look. After soaking your feet, use a quality pair of clippers to trim your toenails straight across. Avoid cutting them too short, as this can lead to ingrown toenails and discomfort.
Shaping Toenails for a Polished Look
Trimming is only half the battle when it comes to the perfect pedicure. Shaping your toenails is vital for a polished finish. To shape your toenails, use a nail file to gently smooth out any rough edges and create a clean, slightly rounded shape. This step not only enhances the aesthetic appeal of your pedicure but also helps prevent snagging on socks and shoes.
Toenails that are neatly trimmed and shaped not only look aesthetically pleasing but also contribute to overall foot health. Properly trimmed and shaped toenails reduce the risk of ingrown nails and other foot problems, ensuring that your feet not only look good but feel good too.
Cuticle Care
Despite being often overlooked, cuticle care is an important part of a smart pedicure. Well-groomed cuticles not only contribute to the overall aesthetic appeal of your feet but also help prevent infection and promote healthy nail growth.
Softening and Pushing Back Cuticles
An important first step in cuticle care is softening them to make the next steps easier and less damaging. To do this, soak your feet in warm, soapy water for a few minutes. Then, using a cuticle pusher, gently push back the softened cuticles to reveal more of the nail bed. Be careful not to push too hard to avoid causing any damage or pain.
Trimming and Grooming Cuticles
Grooming your cuticles involves trimming any excess dead skin carefully. It’s important to use the right tools, such as cuticle nippers, and to trim only the dead skin, avoiding the live tissue. Regularly grooming your cuticles can help prevent hangnails and improve the overall look of your nails.
The key to a successful cuticle trimming is to proceed with caution and only remove what is necessary. Over-trimming can lead to pain, bleeding, and potential infection. If you’re unsure about how much to trim, it’s best to consult a professional pedicurist for guidance.
Moisturizing and Hydrating
Your pedicure isn’t complete without properly moisturizing and hydrating your feet, as this step can make a world of difference in the overall look and feel of your skin. Proper hydration can help keep your skin soft, supple, and youthful-looking.
The Benefits of Rich Moisturizers for Dry Skin
One necessary step in achieving the perfect pedicure is to apply a rich moisturizer that is specifically formulated for dry skin. These types of moisturizers are often thicker in consistency and contain ingredients like shea butter, glycerin, or hyaluronic acid, which help to deeply hydrate and nourish the skin.
Locking in Moisture for Long-Lasting Results
Benefits of using a rich moisturizer for your feet extend beyond just making them look great immediately. By applying a thick layer of moisturizer and allowing it to fully absorb, you can lock in moisture and create a protective barrier that helps prevent dryness and cracking. This step is especially important for those with dry or callused feet, as it can provide long-lasting hydration and keep your skin looking and feeling healthy.
Moisturizing after a pedicure can help maintain the results for longer, ensuring that your feet stay soft and smooth in between treatments. For added benefits, you can cover your feet with socks after applying moisturizer to let the product penetrate deeper into the skin overnight.
Callus Removal and Smoothing
Identifying and Removing Calluses
For a truly smart pedicure, one must first identify the enemy – calluses. These hard, thickened areas of skin, typically found on the heels or balls of the feet, are often caused by pressure or friction. To remove these unsightly patches, start by soaking your feet in warm, soapy water to soften the skin.
Smoothing Rough Patches for Silky Skin
Removal of calluses is just the beginning of achieving impeccably smooth feet. Once the calluses are softened and easier to work with, use a gentle pumice stone or foot file to buff away the dead skin. Remember not to go overboard – a light touch is key to avoid irritating the skin further. Follow up with a rich moisturizer to hydrate and nourish, leaving your feet feeling luxuriously smooth and soft.
Rough patches on the feet can be stubborn, but with a consistent pedicure regimen, you can achieve lasting results. Pay special attention to areas prone to calluses, like the heels and balls of the feet, during your pedicure routine. Regular exfoliation and moisturizing will keep your feet looking and feeling their best, ensuring you step out in style with confidence.
Foot Massage and Relaxation
Keep your pampering session going by indulging in a soothing foot massage to relieve tension and promote relaxation. A foot massage can help improve circulation, reduce stress, and rejuvenate tired feet, leaving you feeling refreshed and revitalized.
Techniques for a Soothing Foot Massage
Techniques for a foot massage can range from simple to more advanced, depending on your comfort level and preferences. Start by applying gentle pressure with your thumbs in circular motions on the soles of your feet, then move on to massaging the toes, heel, and ankles. You can also try using massage tools such as a foot roller or a ball to target specific areas and provide deeper relaxation.
Enhancing Relaxation with Aromatherapy
An crucial oil blend can elevate your foot massage experience, adding a touch of luxury and relaxation. Choose calming scents like lavender, peppermint, or eucalyptus to promote relaxation and stress relief. Simply add a few drops of your chosen crucial oil to a carrier oil, such as almond or coconut oil, and use it to massage your feet for a sensory treat.
To enhance the relaxation benefits of aromatherapy, create a tranquil environment by dimming the lights, playing soft music, and lighting candles. This multi-sensory experience will help you unwind and melt away any lingering tension in both your body and mind.
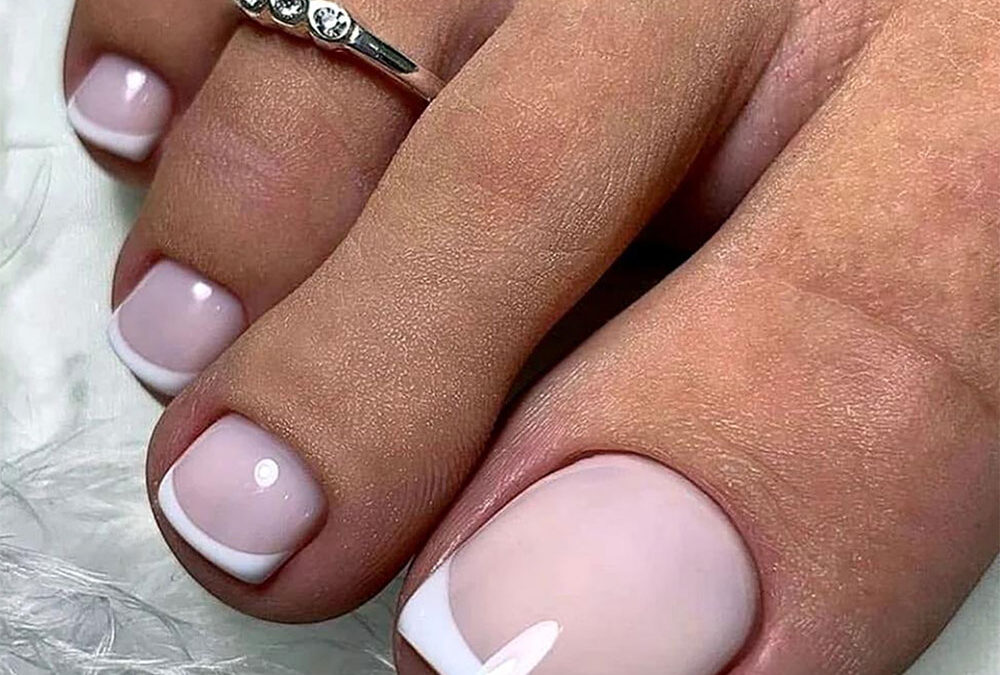
Nail Polish Application
Choosing the Perfect Shade for Your Skin Tone
Not all nail polish shades are created equal, especially when it comes to complementing your unique skin tone. The key to a flawless pedicure lies in selecting the perfect shade that will enhance the beauty of your feet. Fair skin tones tend to look stunning with soft pastel hues, while medium skin tones can pull off vibrant colors like coral or turquoise. For deeper skin tones, rich jewel tones like emerald or sapphire are a fabulous choice. Ultimately, confidence is your best accessory, so choose a shade that speaks to you!
Mastering the Art of Smooth, Even Application
Application is key when it comes to achieving a professional-looking pedicure. To ensure a smooth and even coat of polish, start by applying a base coat to protect your nails and create a smooth surface. After selecting your desired shade, brush on the polish in thin, even strokes from the base to the tip of your nails. Allow each coat to dry completely before applying the next layer to prevent smudges or streaks. Finish with a top coat to seal in the color and add a glossy finish for long-lasting wear.
Another tip to master the art of smooth, even application is to clean up any mistakes or excess polish around the edges of your nails using a small brush dipped in acetone. This simple step will give your pedicure a professional touch and ensure clean, precise lines for a flawless finish.
Finishing Touches
Once again, we find ourselves at the final stage of the smart pedicure journey – the finishing touches. This is where we add those extra details that elevate our pedicure from good to fabulous. From a top coat for a prolonged flawless finish to intricate nail art designs, these final steps will truly showcase your creativity and style.
Adding a Top Coat for Long-Lasting Results
With the base color flawlessly applied and dried, it’s time to seal the deal with a top coat. Choose a high-quality top coat that not only adds shine but also protects your pedicure from chipping and fading. Apply a thin, even layer of top coat over your nails, making sure to cap the edges to prevent premature wear. Let the top coat dry completely before putting on your shoes or socks to ensure a long-lasting, salon-quality finish.
Finishing with a Flourish: Nail Art and Design
Touches of nail art and design can take your pedicure to the next level. Whether it’s a minimalist accent nail, geometric patterns, or intricate designs inspired by the latest trends, nail art allows you to express your individuality and creativity. Consider using nail art tools like striping brushes, dotting tools, or nail stamps to create unique designs that complement your personal style.
Finishing with a flourish by adding nail art and design is a fun way to showcase your personality and enhance your pedicure. Don’t be afraid to experiment with different colors, patterns, and techniques to create a masterpiece on your nails. Whether you opt for a subtle floral design or bold, graphic patterns, nail art is a wonderful way to show off your artistic flair.
Common Mistakes to Avoid
Many aspiring pedicurists fall into common traps when attempting a DIY pedicure. These mistakes can lead to less-than-desirable results and even potential damage to your precious feet. One frequent blunder is over- or under-trimming toenails, which can cause discomfort, ingrown toenails, or an uneven appearance.
Over- or Under-Trimming Toenails
On the quest for perfectly groomed toes, it’s crucial to trim your nails just right. Over-trimming can leave your toes vulnerable to pain and infection, while under-trimming may result in ingrown nails or an untidy look. To achieve the ideal nail length, cut straight across and avoid rounding the corners too much to prevent ingrown toenails. Bear in mind, moderation is key.
Neglecting Cuticle Care and Moisturizing
Any pedicure enthusiast worth their salt knows that cuticle care and moisturizing are non-negotiable steps in the process. Neglecting these crucial aspects can lead to dry, cracked skin, unruly cuticles, and an overall lackluster foot appearance. Make sure to gently push back your cuticles after soaking your feet and regularly moisturize to keep your skin soft and supple.
Understanding the importance of cuticle care and moisturizing not only enhances the aesthetic appeal of your pedicure but also contributes to the health and well-being of your feet. By prioritizing these steps, you’ll not only achieve beautifully groomed toes but also maintain the overall health of your feet in the long run.
Advanced Techniques for the Pedicure Pro
Unlike the basics of a standard pedicure, mastering advanced techniques can take your pedicure game to the next level. Below are some pro tips and tricks to elevate your pedicure services:
- Mastering the Art of Nail Shaping and Design
| Pedicure | Description |
| Cuticle Care | Properly push back cuticles to create a clean nail bed for polish application. |
| Nail Art | Experiment with various nail shapes and designs to offer unique options to your clients. |
Mastering the Art of Nail Shaping and Design
Pedicure pros can showcase their creativity and expertise by mastering the art of nail shaping and design. From trendy coffin shapes to classic almond silhouettes, offering diverse options can cater to different client preferences. Experimenting with nail art techniques like ombre, marble, or geometric designs can add a touch of glamour to your pedicure services, setting you apart as a professional.
Creating Customized Pedicure Treatments
By crafting personalized pedicure treatments, pedicure pros can tailor each service to meet the unique needs and preferences of individual clients. This could involve offering specialty foot soaks, massages, or using organic products for clients with sensitive skin. Providing a bespoke experience not only enhances client satisfaction but also demonstrates your commitment to delivering top-notch pedicure services.
FAQ
Q: What is the importance of mastering the art of the smart pedicure?
A: The smart pedicure is important for maintaining healthy and beautiful feet. It not only keeps your feet looking great but also ensures proper foot care and hygiene.
Q: How often should I give myself a smart pedicure?
A: It is recommended to give yourself a smart pedicure once every 2-4 weeks, depending on the condition of your feet and nails.
Q: What are the steps involved in mastering the art of the smart pedicure?
A: The steps include soaking, exfoliating, trimming nails, pushing back cuticles, moisturizing, and applying nail polish if desired.
Q: What are some tips for achieving a professional-looking smart pedicure at home?
A: Some tips include investing in high-quality tools, taking your time, following each step carefully, and finishing with a top coat for a glossy finish.
Q: How can I maintain the results of my smart pedicure for a longer period?
A: To maintain the results, it’s important to moisturize your feet daily, wear comfortable and breathable shoes, avoid walking barefoot in public areas, and touch up your nail polish as needed.